
Personalised Blue Dragon Teddy Bears
Chunky, characterful, and just a little bit magical, the blue dragon teddy is the kind of bear that makes people stop and look twice. Soft blue plush with a watercolour quality, sparkly lime-green wings and a cream tummy panel that makes the perfect canvas for a name, message, or photo, it’s a proper keepsake for anyone who wants something with a bit more personality. Whether it’s a new baby gift, a birthday bear for a child who’s obsessed with everything fantasy, or something thoughtful for a grown-up who loves dragons, this one travels far beyond the standard teddy bear brief.
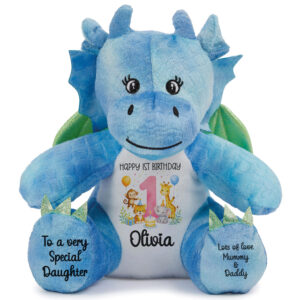

Personalised 1st Birthday Teddy Bears


Personalised Father's Day Teddy Bears
Frequently Asked Questions
What personalisation options are available on the blue dragon teddy bear?
The blue dragon has two personalisation spots. The main one is the smooth cream tummy panel, which is ideal for a name, a short message, a date, or a photo. There's also a second spot on the foot sole, which works brilliantly for adding something extra, like a birth date when the tummy is carrying a name, or a little message to sit alongside a photo. Both are printed using full-colour sublimation printing, so the colours are vivid and the print becomes part of the bear itself.
What occasions is this bear best suited to?
It's a genuinely versatile character. New baby gifts are a natural fit, especially for parents who want something a bit different from the usual pastel bears. The dragon design holds its appeal as children grow, so it moves from the cot to the shelf rather than getting quietly retired. Birthday bears with a child's name printed on the tummy are always a hit, and it's also a popular choice within fantasy and gaming communities where a personalised dragon bear with a name or meaningful date is exactly the kind of thoughtful gift that lands well for adults too.
What does the personalised print look like on this bear?
The cream tummy panel gives the personalisation a clean, clear background, which means names, messages, and photos all come out looking sharp and well-defined. The sublimation printing process bonds the ink directly into the fabric rather than sitting on top of it, so the colours stay vivid and the print won't crack, peel, or fade. The contrast between the pale cream panel and the blue plush body makes the personalisation really stand out.
How does the photo upload and personalisation process work?
When you place your order, you'll be asked to upload your photo and add any name or text you'd like on the bear. Once we receive your order, our team manually edits and optimises your image before it goes to print, adjusting colours and lighting to make sure it looks as good as it possibly can on the bear. High-resolution photos tend to give the best results, but you don't need a professional shot. Every bear is made to order and takes around three to five working days to produce, then arrives via Royal Mail Tracked with an estimated one to two day delivery on top of that. It comes in a free gift bag, ready to give.
Is this bear the same price as other Heart & Sew bears?
Yes, the blue dragon teddy bear is £19.99 including free UK delivery, the same as the rest of the Heart & Sew range. That price includes your personalisation, the free gift bag, and the manual photo editing if you're adding a photo. There are no hidden extras.